
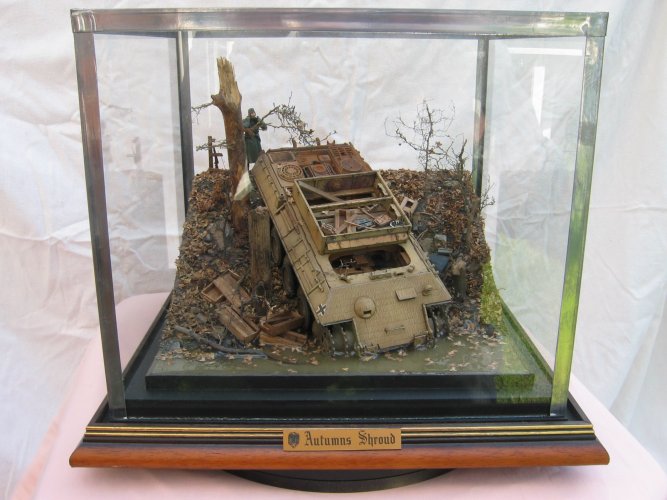
A Potted History
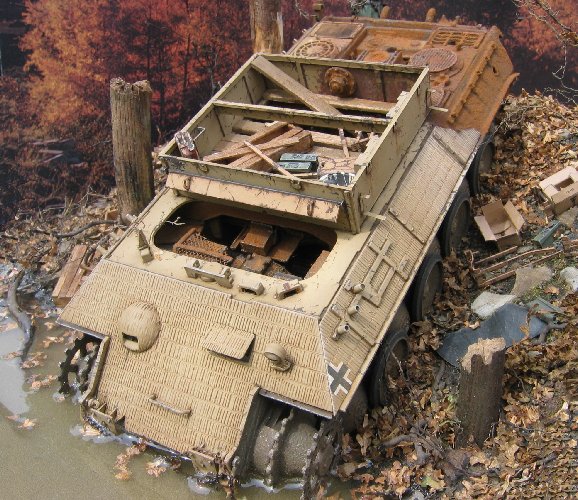
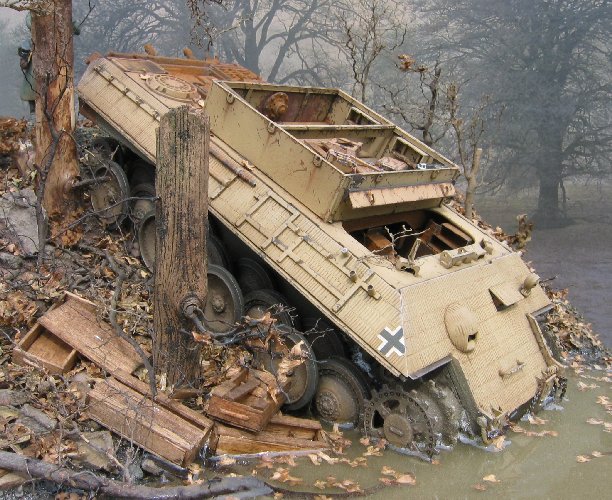
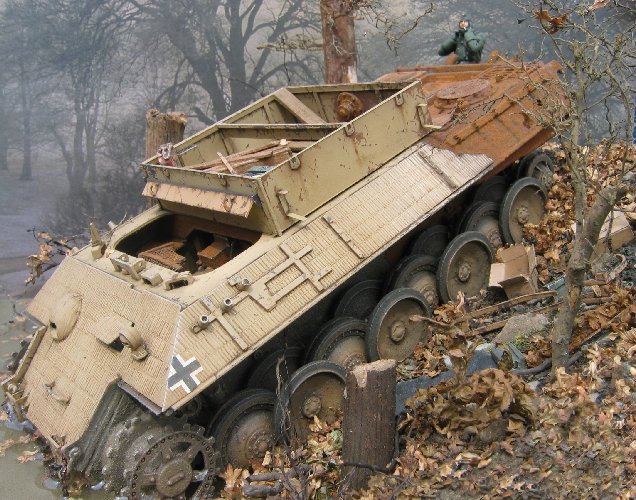
The war in Europe is entering its final stage. The remnants of the German army bled white on the steppes of Russia in the east and reeling under the combined power of the U.S. and Commonwealth forces in the west have been pushed back to the borders of the Reichland. Under constant allied air attack, (the luftwaffe having long ago relinquished command over the skies) no exposed vehicle is safe, no matter how heavily armoured. Even weaponless vehicles utilised for recovery purposes or ammunition replenishment are shown no mercy. Set amidst a splintered, shell torn landscape, a Panther ammunition carrier rests forlornly in the shallows of a woodland pond as the fallen leaves of Autumn symbolise the approaching demise of the Fatherland.
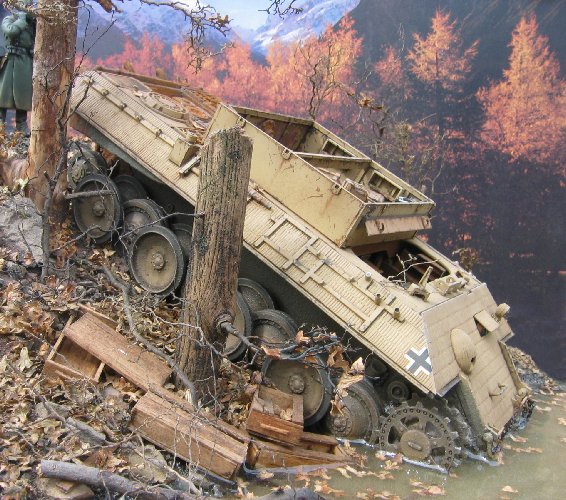
Panther Conversion
For quite a considerable amount of time I have been intending to build a turretless, utility vehicle but was unable to locate a single kit that took my fancy despite visits to a number of model fairs throughout the year. Having carried out a great deal of research on WWII German special purpose vehicles as well as drooling over the superb Bergepanther built by Belgian modeller Marijn Van Gils, I finally decided to attempt a conversion of a Panther A into an ammunition carrier. Utilising the Italeria Panther kit, I commenced the task of removing areas of the hull that were surplus to requirement. The front fenders were the first to go followed closely by the turret ring section which, once removed, revealed a deliciously large expanse of interior of which I intended to take full advantage. Expense number one therefore came in the form of the VP Panther interior kit. Although horrendously expensive, especially as I would only need to use half the contents of the pack (the turret interior of course not being required) I was not unduly concerned as I intended to feature the vehicle minus its tracks, thus balancing out the cash outlay considerably. I commenced work on the installation of the interior fixtures, a challenging but nevertheless enjoyable experience. With everything eventually in place, I test fitted the superstructure to check for any prominent item of interior detail that might cause a problem with regard to a seamless join with the substructure. After a small amount of shaving and relocating, I finally declared myself satisfied with the fit and set the unit aside to dry. Having closely studied detailed drawings of a Bergepanther, I set about itemising the various attachments that I would need to scratch build in order to achieve authenticity. All items were produced from 1 mm plastic card with the exception of hinges, brackets and tie backs for which I delved into my etched metal scrapbox and the strips of planking which were made out of balsa wood. With the completion of the storage platform, I turned my attention to the options of producing a zimmerit finish. My usual medium for zimmerit creation being that of milliput, I openly confess that on this occasion, I chose the easy way out and attached the kit supplied zimmerit. However, with my decision to feature evidence of fire in one of the fuel tanks, a large portion of one of the zimmerit side panels needed to be removed, leaving an uneven, jagged edge. I also felt the necessity to create a small section of zimmerit from milliput to the rear of the hull to simulate an area that had been severely affected by intense heat. The final stage of construction before the application of primer was the building and installing of the kit supplied engine to the engine compartment. Three separate units, namely the substructure featuring the interior detail, the superstructure and the road wheels and sprockets still attached to their sprues would be primed individually prior to painting.
Painting
Mixing together "Humbrol" rust, medium brown and black enamels, I airbrushed the entire model, the dark, reddish brown serving as an excellent base colour for the rusted surfaces as well as creating an element of shadow for the sand yellow that was to follow. I applied three light coats of "Humbrol" 93 dark yellow once the brown base coat had dried, adding a touch of white to each of the mixes. With the total absence of a camouflage pattern, I was able to move directly onto the paint-chipping stage. As I wished to portray the vehicle in a battle scarred, dilapidated condition, the painting of chips, scuffs and eroded paintwork was a vital necessity. Between the unblemished paintwork and the areas where the paint had been totally burnt away, a collage of rust coloured lines and blotches needed to be blended in. Some three hours later, with bloodshot eyes and an aching neck, I was finally satisfied with the result. Two Balkenkreuz dry transfers were trimmed slightly and attached to the forward angle of the superstructure sides after which filters, three in total were administered, leaving each one to dry thoroughly before re-coating. A series of local washes consisting of Burnt Sienna and black oils were followed by a light dry-brushing with ochre and oily steel once the washes had dried.
Weathering
Moving on to the sub-structure, I prepared my standard cocktail of black/earth enamel, bicarbonate of soda and fine sand. This paste I applied by brush to the lower hull, wheels and suspension thus creating a mud-like texture which, once dry, would dry-brush up beautifully. Certain parts of the interior I treated to couple of coats of instant rust solution, likewise with the fire damaged area around the fuel tank. With painting almost complete, I finished off the interior colour scheme by gently working in three shades of MIG powdered rust, thus creating a further degree of depth. All that remained to be carried out was the painting and weathering of the strips of planking. I figured that the decking would have sustained a tremendous amount of punishment from the hob-nailed boots of the crew and therefore needed to be portrayed in a well worn, scuffed condition. I began by coating each strip with "Humbrol" natural wood and, once dry, I gently sanded away random sections of the paint with a fine grain sandpaper. I finished off by applying three thin washes of Burnt Sienna and black oils which succeeded in bringing out the grain of the wood. With the planks slotted into position at a variety of angles permitting subtle glimpses of the interior beneath and the road wheels and sprockets attached, the munitionspanzer was finally complete.
Groundwork
Having decided to feature the Panther marooned at the foot of a steep embankment, I began by cutting to size a piece of 20mm thick plasterboard after which I measured in a border of 16mm and masked out with tape. The walls of the diorama, constructed out of 2mm thick balsa wood, I drew out, cut to size and cemented into place on the board.. I next selected a number of polystyrene tiles, glued them together and carved them into shape once set, creating a tier-like effect. The embankment area as far down as the pond I covered with celluclay into which I embedded a variety of stones and pebbles. Over this I sprinkled a generous layer of fine sand, grit and a small amount of static grass, all of which I sealed with a thin layer of white glue. The pond bed itself I sculpted out of plaster and treated similarly to the embankment, omitting the static grass. After leaving for a couple of days in an airing cupboard for the moisture content of the celluclay to evaporate completely, I base coated the entire surface with a dark earth enamel and, once dry, dry-brushed with a range of light earth colours.

Autumn Fall
With the paintwork complete, it was time to add a flavour of autumn to the scene. Before breaking out the "Hudson and Allen" forest litter however, I chose to attach the components of the diorama to the base, commencing with the vehicle itself. Prior to covering the polystyrene tiles with celluclay earlier, I had positioned the Panther onto the surface, marked either side of the wheels with a pen and shaved out two shallow indentations. Into these grooves I now glued and located the wheels of the carrier, ensuring that the front of the hull jutted out sufficiently enough into the pond. I next drilled indentations into the celluclay and attached a number of splintered tree trunks and bushes. A few items of debris (including a number of scratch built ammunition crates I had painted earlier) I fixed at random intervals around the vehicle. The final addition was a dejected looking German soldier scavenged from an old, cannibalised diorama. With everything in place, I began at the apex of the slope and, working in areas of approximately 3 inches square, proceeded to daub on layers of white glue closely followed by a sprinkling of 1/35th scale autumn leaves. With the entire surface unevenly covered, the diorama was left overnight to dry. Any touching up of scuffed paintwork was carried out at this stage after which I mixed up a thin glaze consisting of medium brown and natural wood enamels and applied it overall to the foliage in order to create a dead, faded appearance. Satisfied with the groundwork, the final procedure consisted of the pouring of "Envirotex Lite" to create the water effect. Onto this surface I distributed more leaves to complete the autumn scene and with the removal of all masking tape and the painting in of the border with matt black enamel, the diorama was finally complete.
Roy Wells
https://www.facebook.com/groups/WW2DioramaArt/
http://homepage.ntlworld.com/rs_wells/Index.htm